

How To Install Creo 3.0 In Windows 10
Topic: Installation of PTC Creo 3.0 Parametric | Creo iii.0 System Requirements |
Last Updated: September-10-2021
Installation of PTC Creo 3.0 parametric is a bit Like shooting fish in a barrel task. I will show you lot how to install it step by step. The most important thing is which package you lot desire to install? Student version? or a croaky version? We have discussed both procedures beneath.
I recommend going for the student version of PTC Creo Parametric. You tin can download it from the following links.
- For College Student version of PTC Creo Parametric 3.0: Click Here
- K-12 Student version of PTC Creo Parametric 3.0: Click Here
- For M-12 Educator version of PTC Creo parametric 3.0 For K-12: Click Here
submit your details and follow up the Screen Instructions.
***If you lot want to unlock more features of PTC Creo Parametric 3.0 you need to Download a Cracked version of PTC Creo Parametric 3.0
Get to "Get into pc" website, Search "Creo three.0" yous can see creo 3.0 In search results, Download suitable bit version (Look for the server to prepare your download)

Note: The links are Periodically Updating So that is why we did not mention the links. But I'm sure the download pack is always available in Get into Pc website.
PROCEDURE for Installation of PTC Creo 3.0
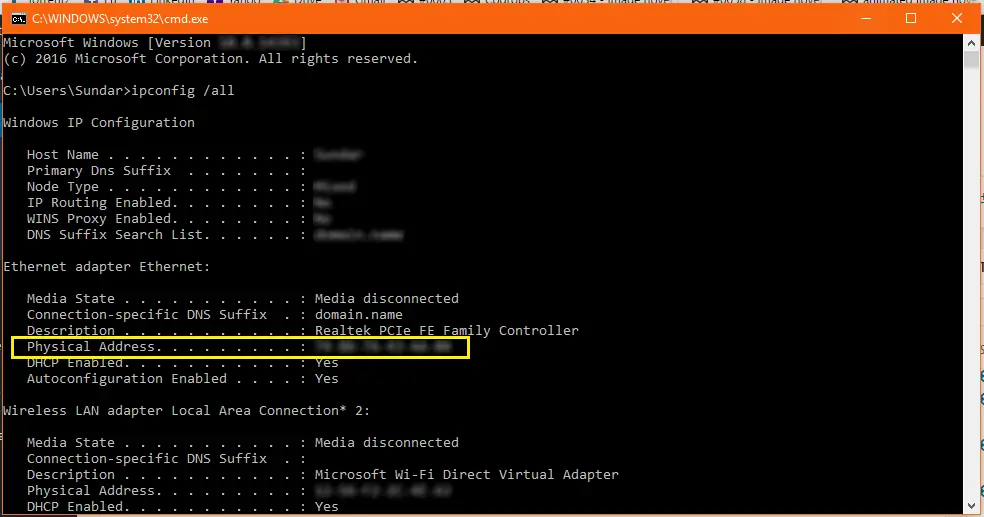
i. Getting Ethernet Physical Address.
Installation of PTC Creo iii.0 parametric in Windows platform requires ethernet concrete accost. To go Ethernet physical follow the steps.
- Type CMD in RUN (windows key+ R) program and press " ENTER" button.
- Type IP config /all and printing"ENTER"button .
- Copy the physical address into a Notepad (check screenshot).
- Setting up Licence file.
In the Creo setup folder, you lot will find "SOLID Team" binder. You tin can observe a license file "ptc_licence.dat" in the folder.
- Open up that file with NOTEPAD
- Go to EDIT from quick access toolbar select replace feature.
- Replace 00-00-00-00-00-00 with the physical address you take copied in Notepad.
- Relieve in documents
- RUN SETUP.
- Run the setup.
- Agree to the agreements and policies by checking check marking and click adjacent.
- Drag and driblet the created license file in thesource field (check the screenshot). [Make sure the Status should be shown "available" so only the licence file will be working]
- Click next.
- Bank check the required products from PTC.
- Click INSTALL . Wait for the installation procedure to be completed and click FINISH.

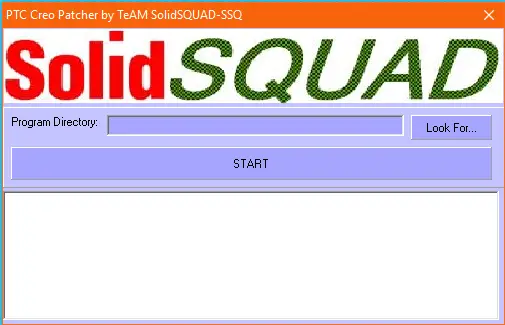
- PATCHING
- Open the SOLID SQUAD binder.
- Run the File "PTC_Creo_Patcher_0.1_SSQ.exe" as administrator. (Now a window popup every bit shown in below screenshot)
- click onLOOK FOR(cheque screenshot)
- Scan for the folderInstallation Directory\PTC\Creo iii.0\M010 (By defaultC:\Program Files\PTC\Creo 3.0\M010)
- Again click Look FOR. (Make sure the path should be shown in the box, once we click "look for" button)
- Click on PATCH
- Wait for this prompt " All done bask "
Done.
It is amend to restart your system.
Relish.
System Requirements to run PTC Creo 3.0 Parametric
- Bone – Windows XP, Windows Vista, Windows vii, Windows 8, Windows 8.one
- Memory – Minimum 3GB RAM
- Defended video RAM
- Hardware Requirement – 3 button mouse
Learn about additional requirements here
Too, read about Solidworks installation procedures.
Tags: Creo 3.0, creo iv.0, Installation of Creo 3.0, Creo 3.0 Organization Requirements, Creo Installation, How to install creo parametric 2.0, Creo two.0.
Source: https://extrudesign.com/installation-of-ptc-creo-3-0/
Posted by: petersonbeforrome1969.blogspot.com
0 Response to "How To Install Creo 3.0 In Windows 10"
Post a Comment